

Table of contents
Why This Lab Matters (And Why You Should Care)
If you’re studying for your CCNA, there’s one thing you absolutely have to understand: How encapsulation and decapsulation in TCP/IP actually work and how data moves across the network.
It’s not enough to know the OSI or TCP/IP models in theory — you need to see it happening live, packet-by-packet.
That’s exactly what this hands-on lab gives you.
You’ll build a simple network, capture real packets with Wireshark, and watch data get wrapped and unwrapped as it flows across the router. This is real-world networking 101, and by the end of this lab, you’ll know how to analyze packets like a pro.
If you want to think like a network engineer, this is where you start.
Lab Summary
- Lab Name: Data Encapsulation and De-encapsulation in TCP/IP with Packet Analysis
- Lab Difficulty: Beginner
- Approximate Time: 40 minutes
- Preferred Image: x86_64_crb_linux-adventerprisek9-ms
- Book Reference: CCNA 200-301 Official Cert Guide, Volume 1 (2nd Edition) – Cisco Press
- Lab on: Chapter 1: Introduction to TCP/IP Networking
- Figure: 1-11 (Larry Using Ethernet to Forward an IP Packet to Router R1)
What You’ll Set Up
Here’s the network you’ll build:
| Device | IP Address | Subnet Mask | Gateway |
|---|---|---|---|
| PC1 | 192.168.1.10 | 255.255.255.0 | 192.168.1.1 |
| PC2 | 192.168.2.10 | 255.255.255.0 | 192.168.1.1 |
| Router e0/0 | 192.168.1.1 | 255.255.255.0 | – |
| Router e0/1 | 192.168.2.1 | 255.255.255.0 | – |
You’ll have two PCs in separate subnets connected by a router, so traffic has to cross the router to get from PC1 to PC2.
The fun part? You’ll capture that traffic live with Wireshark and break down every packet.
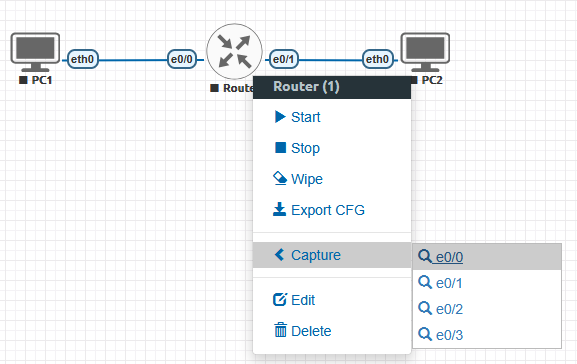
Topology Diagram
Below is the topology diagram for this lab setup:

Prerequisites
You’ll need:
- EVE-NG installed and running.
- A working IOL L3 router image.
- Two vPCS devices for the PCs.
- Wireshark installed and ready to capture.
- Basic familiarity with Wireshark filters.rs and navigation.
Implementation Steps
Step 1: Set up the topology
- Add a router and two vPCS devices to the EVE-NG workspace.
- Connect:
- PC1 to Router (e0/0).
- PC2 to Router (e0/1).
Step 2: Configure the devices
1. Router configuration:
- Access the router CLI and configure the interfaces: (disregard the initial configuration with [n]
Would you like to enter the initial configuration dialog? [yes/no]: n

Would you like to terminate autoinstall? [yes]: y
Router>enable
Router#configure terminal
Router(config)#interface e0/0
Router(config-if)#ip address 192.168.1.1 255.255.255.0
Router(config-if)#no shutdown
Router(config-if)#exit
Router(config)#
*Feb 24 13:36:37.682: %LINK-3-UPDOWN: Interface Ethernet0/0, changed state to up
Router(config)#
*Feb 24 13:36:38.683: %LINEPROTO-5-UPDOWN: Line protocol on Interface Ethernet0/0, changed state to up
Router(config)#
Router(config)#interface e0/1
Router(config-if)#ip address 192.168.2.1 255.255.255.0
Router(config-if)#no shutdown
*Feb 24 13:37:31.493: %LINK-3-UPDOWN: Interface Ethernet0/1, changed state to up
Router(config-if)#
*Feb 24 13:37:32.493: %LINEPROTO-5-UPDOWN: Line protocol on Interface Ethernet0/1, changed state to up
Router(config-if)#2. PC configurations:
- On PC1:
VPCS> ip 192.168.1.10 255.255.255.0 192.168.1.1
Checking for duplicate address...
VPCS : 192.168.1.10 255.255.255.0 gateway 192.168.1.1

VPCS> set pcname PC1- On PC2:
VPCS> ip 192.168.2.10 255.255.255.0 192.168.2.1
Checking for duplicate address...
VPCS : 192.168.2.10 255.255.255.0 gateway 192.168.2.1

VPCS> set pcname PC2
Step 3: Test connectivity
- From PC1, ping PC2:
PC1> ping 192.168.2.10

84 bytes from 192.168.2.10 icmp_seq=1 ttl=63 time=1.909 ms
84 bytes from 192.168.2.10 icmp_seq=2 ttl=63 time=0.994 ms- From PC2, ping PC1:
PC2> ping 192.168.1.10

84 bytes from 192.168.1.10 icmp_seq=1 ttl=63 time=0.825 ms
84 bytes from 192.168.1.10 icmp_seq=2 ttl=63 time=1.887 ms
Step 4: Capture packets using Wireshark
- Start capturing packets:
- Right-click on the interface connecting PC1 to the router in EVE-NG.
- Select Capture to open Wireshark.
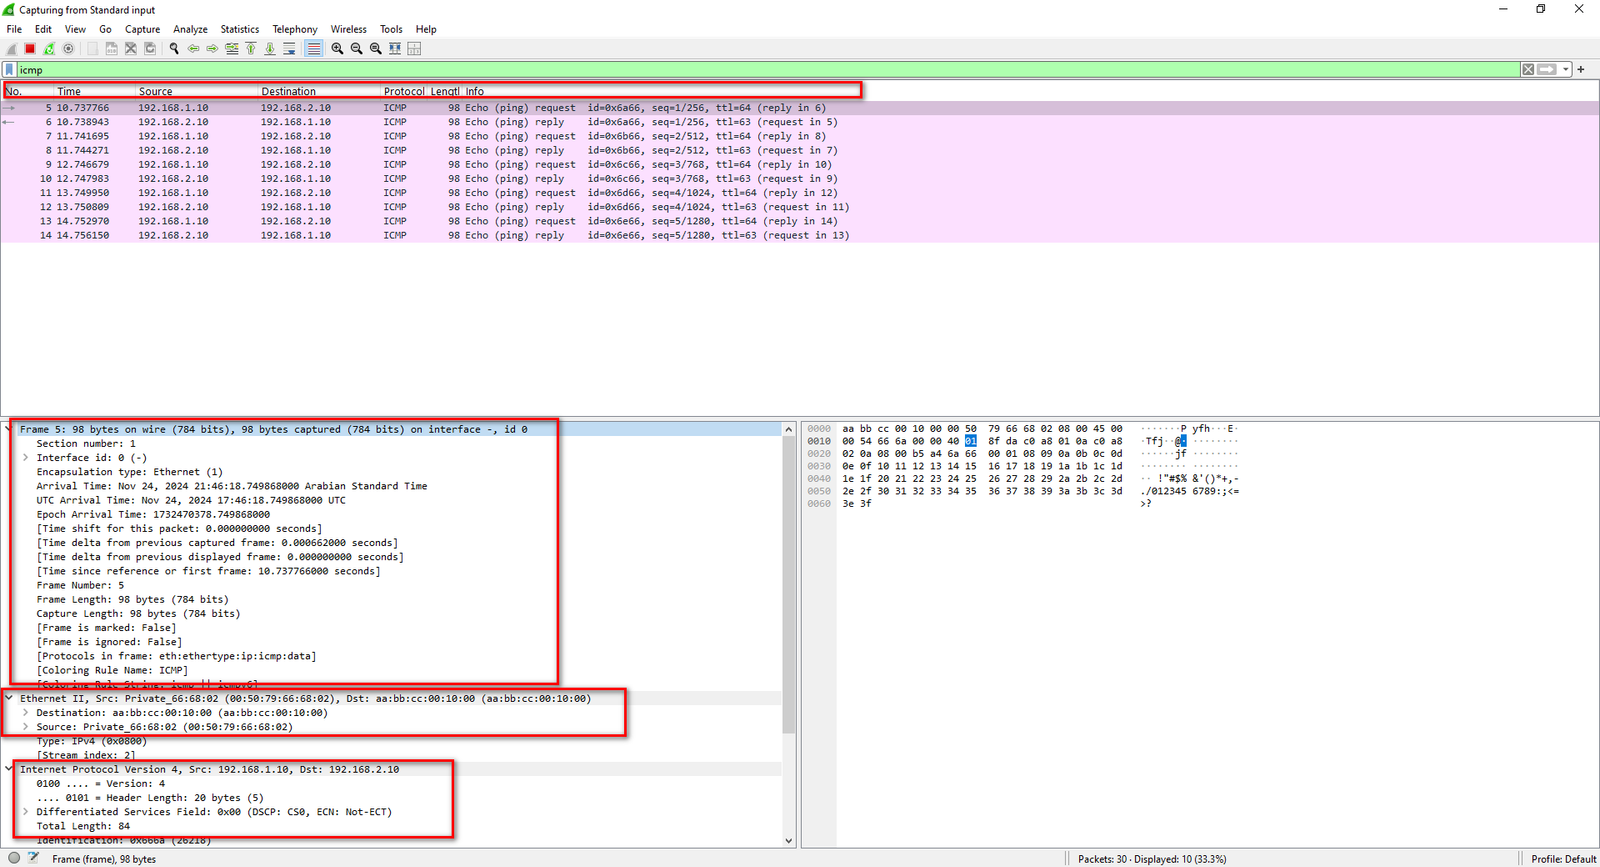
- Ping and observe packets:
- From PC1, initiate a ping to PC2.
- Observe the ICMP Echo Request and Echo Reply packets in Wireshark.
- Analyze encapsulation and de-encapsulation:
- Use the filter ICMP to focus on ICMP packets.
- Expand packet details to observe:
- Ethernet Header: Source and destination MAC addresses.
- IP Header: Source and destination IP addresses.
- ICMP Header: Echo Request and Echo Reply details.
Verification & Testing
- Both PCs should be able to ping each other through the router.
- Wireshark should display:
- ICMP Echo Request and Echo Reply packets.
- Proper encapsulation at the Ethernet, IP, and ICMP layers.
Troubleshooting Tips
- If ping fails:
- Double-check all IP addresses and subnet masks.
- Use
show ip interface briefon the router to confirm interfaces are up. - Confirm the correct default gateway is set on both PCs.
- If Wireshark shows no packets:
- Make sure you’re capturing the right interface.
- Try restarting the capture.
Key Commands
Assign IP address and gateway on PCs:
ip Configure router interfaces:
interface
ip address
no shutdown
Test connectivity:
ping Key Takeaways
- You’ll understand exactly how data gets encapsulated and de-encapsulated as it flows across the network.
- You’ll know how to use Wireshark to capture and analyze packets.
- You’ll practice troubleshooting real inter-subnet communication.uter.
Real-world Application
This is exactly how network engineers troubleshoot real networks. If you’ve ever wondered:
- Why can’t this PC ping that server?
- Is the packet even leaving the device?
- Is it getting blocked on the way?
- What’s inside the packet at each layer?
This lab gives you the tools to find out.
Common Pitfalls to Avoid
- Forgetting
no shutdownon router interfaces. - Typing the wrong IP address or subnet mask.
- Capturing the wrong interface in Wireshark.
Validation Checklist
- Correct IP and gateway configurations on devices.
- Router interfaces are up and operational.
- Ping tests are successful.
- Wireshark shows ICMP packets with correct headers.
Download This Lab’s Workbook & EVE-NG File
Want to save this lab for later? Download the PDF workbook and the EVE-NG file right here:
Download Free Workbook & EVE-NG File (coming soon)
Final Thought
If you want to pass your CCNA and feel confident in real networking scenarios, there’s no shortcut.
Hands-on labs like this are the only way to build real skills — and you can get access to all 130+ labs for free today.
