

Table of contents
So, you’re gearing up for your CCNA, huh? Exciting times! One of the best ways to prepare is by setting up a comprehensive CCNA lab to practice.
But let me guess—you’ve heard you need a fancy lab setup, maybe even some expensive gear, right?
Here’s the deal: you don’t.
Seriously, you can build an awesome CCNA lab at home without spending a single dollar.
Yep, zero.
In this guide, I’ll walk you through how to set up your free lab, using tools like EVE-NG and GNS3 (trust me, they’re the real MVPs).
Plus, I’ll throw in tips on where to snag free CCNA labs PDFs, practice tests, and even ready-made solutions to get you started.
No fluff, no unnecessary steps—just the good stuff.
Ready to roll? Let’s do this!
Step 1: Understanding CCNA Labs
Before diving into the tools and setups, let’s talk about CCNA labs for a sec. What are they, and why are they such a big deal?
What Are CCNA Labs?
Simply put, CCNA labs are hands-on environments where you can practice all those networking concepts you’re learning.
Think of it as your playground to try out commands, troubleshoot, and really get the hang of how networks work.
Types of CCNA Labs
There are two main types of labs you’ll come across during your CCNA journey:
- Basic Labs
- These are great for beginners and focus on simple tasks like:
- Configuring IP addresses on PCs.
- Setting up switches for basic connectivity.
- Testing connectivity using commands like ping.
- These are great for beginners and focus on simple tasks like:
- Advanced Labs
- Once you’re comfortable with the basics, you can move on to:
- Setting up VLANs and trunking.
- Configuring Inter-VLAN routing using routers.
- Troubleshooting more complex multi-device topologies.
- Once you’re comfortable with the basics, you can move on to:
Why Are CCNA Labs Important?
Here’s the cool part: CCNA labs are like the ultimate cheat code for acing your CCNA exam. They help you:
- Practice real configurations—like setting up VLANs or troubleshooting routing issues.
- Understand network behavior—so you know what’s happening behind the scenes.
- Build confidence—because theory is great, but nothing beats doing it for real.
Step 2: Choosing the Right Free Tools
Alright, now that we’ve covered what CCNA labs are and why they’re important, let’s talk tools. Setting up a killer lab doesn’t mean you need to spend hundreds on fancy hardware. Thanks to some amazing free tools, you can create a virtual lab that’s just as good (and sometimes better) than the real thing.
But here’s the catch—not all tools are created equal. While Packet Tracer is a popular choice for beginners, it has its limitations when it comes to real-world scenarios. For that, you’ll want to explore tools like EVE-NG and GNS3, which are built for more advanced, realistic network simulations. Trust me, these are the tools you’ll want to stick with.
So, let’s break down the best options for your free CCNA lab setup.
The Best Free Tools for Your CCNA Lab
1. EVE-NG (Emulated Virtual Environment Next Generation)
Why It’s Awesome:
- EVE-NG is like the Swiss Army knife of network emulators. It’s designed for advanced labs and supports a wide range of virtual devices, including Cisco routers and switches.
- Perfect for practicing complex setups like VLANs, trunking, and even multi-site networks.
Key Features:
- Drag-and-drop topology creation.
- Real-world device emulation.
- Multi-user collaboration.
How to Get Started:
- Download the EVE-NG OVA file for free: Download EVE-NG OVA File
- Learn how to install EVE-NG on a virtual machine: EVE-NG Installation Guide
Pro Tip — Combine EVE-NG with free Cisco IOS images for an even more realistic experience.
2. GNS3 (Graphical Network Simulator 3)
Why It’s Great:
- GNS3 is a fan favorite for emulating Cisco devices. It’s more hardware-intensive than Packet Tracer but offers far more flexibility and realism.
- Ideal for both CCNA beginners and advanced users.
Key Features:
- Supports real Cisco IOS images.
- Allows integration with virtual machines for hybrid labs.
- Great for practicing real-world troubleshooting.
How to Get Started:
- Download GNS3 for free from the official site.
- Install GNS3 on your computer or a virtual machine: How to Install GNS3
Pro Tip — Use their built-in templates to quickly create lab topologies.
3. Packet Tracer
Why You Might Use It:
- Packet Tracer is Cisco’s official tool and is great for beginners who want a quick way to practice simple labs.
- It’s lightweight and easy to use, making it perfect for entry-level scenarios.
Key Limitations:
- It doesn’t support real IOS images.
- Not ideal for advanced labs or real-world simulations.
Recommendation: Use Packet Tracer to get comfortable with basic configurations, but switch to EVE-NG or GNS3 for deeper learning.
For a full breakdown of why Packet Tracer might not be the best choice for real-world practice, check out my article: Is Packet Tracer Good Enough for CCNA?.
Now that you know which tools to use, it’s time to roll up your sleeves and start building your lab.
In the next section, I’ll walk you through setting up a simple lab topology to get started.
Step 3: Setting Up Your First Lab
Alright, now that you’ve got your tools sorted, it’s time to get your hands dirty! Setting up your first lab might sound intimidating, but trust me, it’s easier than you think.
In this section, I’ll guide you step-by-step to build a simple network topology using tools like EVE-NG or GNS3.
We’ll keep it beginner-friendly, but you’ll also learn some real-world configurations along the way.
Ready? Let’s dive in!
Step-by-Step: Building Your First Lab
Step 1: Install and Set Up Your Tool
Why this step? This step sets up the foundation for your lab, where you’ll simulate your network.
For this guide, we’ve chosen EVE-NG as the default tool because of its power and flexibility. Getting started with EVE-NG is simple, and we’ve got everything you need to get it up and running:
- Download the EVE-NG OVA File: Head over to EVE-NG OVA File Download to get the file.
- Follow the Installation Guide: Learn how to set up EVE-NG in just 5 easy steps with our beginner-friendly guide How to Install EVE-NG.
Step 2: Choose Your Topology
Why this step? A clear topology plan helps you focus on your learning objectives.
For your first lab, we’ll keep it simple:
- Two PCs connected to a Layer 2 switch.
- Each PC assigned an IP address in the same subnet.
Example Topology:
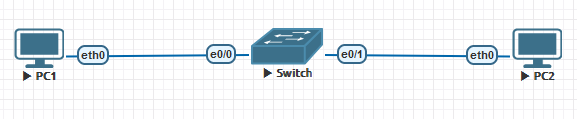
• PC1: 192.168.1.1
• PC2: 192.168.1.2
• Subnet: 192.168.1.0/24
• Device:  Switch
Step 3: Add Devices to Your Lab
Why this step? You need to set up the actual components of your network.
Open your tool (EVE-NG or GNS3) and:
- add two switch onto the canvas.
- Add two PCs and connect them to the switch using cables (virtual links).
Step 4: Configure the Devices
Why this step? This ensures your devices can communicate.
Assign IP addresses to each PC:
- Open the CLI of each PC.
- Use commands like:
VPC1> ip 192.168.1.1 255.255.255.0
VPC2> ip 192.168.1.2 255.255.255.0
Tip: In EVE-NG, use vPCS for lightweight PC simulation.
Step 5: Test the Connection
Why this step? Testing confirms your configuration is working.
Use the ping command from PC1 to PC2 to verify connectivity:
VPC1> ping 192.168.1.2If you see replies, congratulations! Your first lab is up and running.
Step 6: Save Your Lab
Why this step? Saving lets you revisit or build upon your setup later.
Save your topology in your tool for future use.
Congrats on completing your first lab! Now that you’ve got the basics down, you’re ready to tackle more advanced setups, like VLANs and routing.
Advanced Lab Topology
Now that you’ve mastered the basics, let’s kick it up a notch with a more advanced setup.
Why this step? Advanced labs help you understand complex configurations and prepare for real-world scenarios.
Here’s the setup for your advanced lab:
- Devices:
- 3 Switches (Layer 2)
- 4 PCs
- Network Design:
- Configure two VLANs (e.g., VLAN 2 and VLAN 3).
- Use Inter-VLAN Routing to enable communication between VLANs.
- Assign different subnets to each VLAN.
Example Topology:

Example Configuration
- VLAN 2:
- Subnet: 192.168.2.0/24
- PC4: 192.168.2.11
- PC6: 192.168.2.12
- VLAN 3:
- Subnet: 192.168.3.0/24
- PC5: 192.168.3.11
- PC7: 192.168.3.12
- VLAN 4: (Unused)
- Subnet 192.168.4.0/24
Step 1: Assign Hostname on All Switches
Switch>
Switch>enable
Switch#configure terminal
Switch#hostname SW1
SW1#
Switch>
Switch>enable
Switch#configure terminal
Switch#hostname SW2
SW2#Switch>
Switch>enable
Switch#configure terminal
Switch#hostname SW3
SW3#Step 2: Create Vlans on All switches
SW1(config)#vlan 2
SW1(config-vlan)#name Data_VLAN_2
SW1(config-vlan)#exit
SW1(config)#vlan 3
SW1(config-vlan)#name Data_VLAN_3
SW1(config-vlan)#exit
SW1(config)#vlan 4
SW1(config-vlan)#name Mgmt_VLAN_4
SW1(config-vlan)#exit
SW2(config)#vlan 2
SW2(config-vlan)#name Data_VLAN_2
SW2(config-vlan)#exit
SW2(config)#vlan 3
SW2(config-vlan)#name Data_VLAN_3
SW2(config-vlan)#exit
SW2(config)#vlan 4
SW2(config-vlan)#name Mgmt_VLAN_4
SW2(config-vlan)#exitSW3(config)#vlan 2
SW3(config-vlan)#name Data_VLAN_2
SW3(config-vlan)#exit
SW3(config)#vlan 3
SW3(config-vlan)#name Data_VLAN_3
SW3(config-vlan)#exit
SW3(config)#vlan 4
SW3(config-vlan)#name Mgmt_VLAN_4
SW3(config-vlan)#exitStep 3: Configure Inter-VLAN Routing on Main Switch by adding VLANS IP (SW1)
SW1(config)#interface vlan 2
SW1(config-if)#ip address 192.168.2.1 255.255.255.0
SW1(config-if)#exit
SW1(config-if)#interface vlan 3
SW1(config-if)#ip address 192.168.3.1 255.255.255.0
SW1(config-if)#exit
SW1(config-if)#interface vlan 4
SW1(config-if)#ip address 192.168.4.1 255.255.255.0
SW1(config-if)#exit
Step 4: Configure Trunk Ports for Switches (SW1)
SW1(config-if)#interface eth0/0
SW1(config-if)#switchport trunk encapsulation dot1q
SW1(config-if)#switchport mode trunk
SW1(config-if)#switchport trunk allowed vlan 1,2,3,4
SW1(config-if)#exit
SW1(config)#interface eth0/1
SW1(config-if)#switchport trunk encapsulation dot1q
SW1(config-if)#switchport mode dynamic auto
SW1(config-if)#switchport trunk allowed vlan 1,2,3,4
SW1(config-if)#end
SW1#
Step 5: Configure Access Port on SW2 and SW3
- On SW2
SW2(config)#interface eth0/1
SW2(config-if)#switchport mode access
SW2(config-if)#switchport access vlan 2
SW2(config-if)#exit
SW2(config)#interface eth0/2
SW2(config-if)#switchport mode access
SW2(config-if)#switchport access vlan 3
SW2(config-if)#exit- On SW3
SW3(config)#interface eth0/1
SW3(config-if)#switchport mode access
SW3(config-if)#switchport access vlan 2
SW3(config-if)#exit
SW3(config)#interface eth0/2
SW3(config-if)#switchport mode access
SW3(config-if)#switchport access vlan 3
SW3(config-if)#exit
Step 6: Configure Trunk Port on SW2 and SW3
- on SW2
SW2(config-if)#interface eth0/0
SW2(config-if)#switchport trunk encapsulation dot1q
SW2(config-if)#switchport mode trunk
SW2(config-if)#switchport trunk allowed vlan 1,2,3,4
SW2(config-if)#end
SW2#- on SW3
SW3(config-if)#interface eth0/0
SW3(config-if)#switchport trunk encapsulation dot1q
SW3(config-if)#switchport mode dynamic desirable
SW3(config-if)#switchport trunk allowed vlan 1,2,3,4
SW3(config-if)#end
SW3#
Step 7: Configure IP Addresses on Clients
VLAN2:
- PC4
ip 192.168.2.11/24 192.168.2.1
set pcname pc4- PC6
ip 192.168.2.12/24 192.168.2.1
set pcname pc6
VLAN 3:
- PC5:
ip 192.168.3.11/24 192.168.3.1
set pcname pc5- PC7
ip 192.168.3.12/24 192.168.3.1
set pcname pc7
Step 8: Test Connectivity
Within VLANs:
- From PC4 → PC6 ping 192.168.2.12
PC4> ping 192.168.2.12

84 bytes from 192.168.2.12 icmp_seq=2 ttl=64 time=4.939 ms
84 bytes from 192.168.2.12 icmp_seq=3 ttl=64 time=2.586 ms
Inter-VLAN:
- From PC4 →PC7 ping 192.168.3.12
pc4> ping 192.168.3.12

84 bytes from 192.168.3.12 icmp_seq=2 ttl=63 time=2.641 ms
84 bytes from 192.168.3.12 icmp_seq=3 ttl=63 time=4.724 ms- Ping from PC4 to PC7 to ensure inter-VLAN routing is working.
- If the connection fails, check your VLAN configurations subinterfaces.
Accessing Free CCNA Lab Resources
Where to Find Free Resources?
Let’s be real for a second—finding free CCNA lab resources online isn’t easy. And when you do stumble across something, it’s usually one of two things:
- Outdated and clunky: Stuff that barely scratches the surface of what you actually need.
If you’re serious about CCNA, you need something better. Something that actually prepares you for both the exam and the real world. That’s where the CCNA Full Pack comes in.
Why the CCNA Full Pack Is a Game-Changer
- 130+ Real-World Labs
- These aren’t your run-of-the-mill labs. They’re designed to teach you the skills that matter.
- You’ll cover everything from basic VLAN setups to advanced routing protocols like OSPF and BGP.
- 2. Ready-to-Go Configs
- Every lab comes with:
- Raw configuration files for you to practice from scratch.
- Saved configurations so you can check your work or skip straight to troubleshooting.
- Every lab comes with:
- 14-Day Free Trial
- You can test the entire CCNA Full Pack for free for 14 days.
- No strings attached. Just jump in and see how much value it adds to your CCNA journey.
- More Than Just Labs
- You also get cheat sheets, mock exams, and guides to ensure you’re ready for both the exam and your first networking job.
Why You Should Try It
Look, I get it. Free resources are tempting, but most of what you’ll find online just doesn’t cut it. The CCNA Full Pack is different—it’s your one-stop-shop for mastering CCNA, building confidence, and getting job-ready.
By the time you’re done with these labs, you won’t just pass the exam—you’ll walk into your first interview and absolutely crush it.
Start Your Free Trial Today
It’s time to take your CCNA prep to the next level. Don’t just aim to pass—aim to master:

1 response
Assalamu Alaikum,
I really enjoyed this single lab. i would like to prepare for the exams using this plateform. would love to be guided with such practical approach.