


Lab Overview
- Lab Title: Comprehensive Real-World VLAN and Inter-VLAN Design
- Level: Advanced
- Estimated Time: ~60 minutes
- Image Used: x86_64_crb_linux_l2-adventerprisek9-ms
- Book Reference: CCNA 200-301 Official Cert Guide Vol.1, Chapter 8
Story Start: “The Network Is Live. And It’s a Mess.”
You’ve just joined the IT team of a growing mid-sized company.
Departments are complaining: “Why are our printers visible to the wrong team?”
Voice calls drop randomly. Management can’t even log in to the switches securely.
You check the setup and it hits you: Everything is in VLAN 1. No segmentation. No security. No voice isolation.
Your task: Redesign the network.
- Create VLANs for departments
- Add trunk links between switches
- Implement Inter-VLAN routing via Router-on-a-Stick
Time to turn chaos into clarity.
Why This Lab Matters
This isn’t a textbook exercise. This is how real companies expect their networks to behave:
- Devices separated by department
- Centralized management access
- Trunked uplinks between floors
- Voice VLANs prioritized for QoS
In this lab, you’ll build all of that. Step by step. By the end, you’ll be able to plan, configure, and troubleshoot an enterprise-grade VLAN design.
What You’ll Build
- 3 switches (SW1, SW2, SW3)
- 4 PCs (PC4, PC5, PC6, PC7) across 2 departments
- VLANs: Data (2 & 3), Management (4)
- Trunk links between SW1 → SW2 and SW1 → SW3
- Router-on-a-Stick Inter-VLAN routing on SW1
VLANs:
- VLAN 2: Data VLAN for PCs in VLAN 2.
- VLAN 3: Data VLAN for PCs in VLAN 3.
- VLAN 4: Management VLAN for network administration.
Subnets:
- VLAN 2: 192.168.2.0/24
- VLAN 3: 192.168.3.0/24
- VLAN 4: 192.168.4.0/24
Trunk Links:
- SW1 to SW2: Trunk carrying VLANs 1, 2, 3, 4 via E0/0.
- SW1 to SW3: Trunk carrying VLANs 1, 2, 3, 4 via E0/1.
Topology Diagram
Below is the topology diagram for this lab setup:
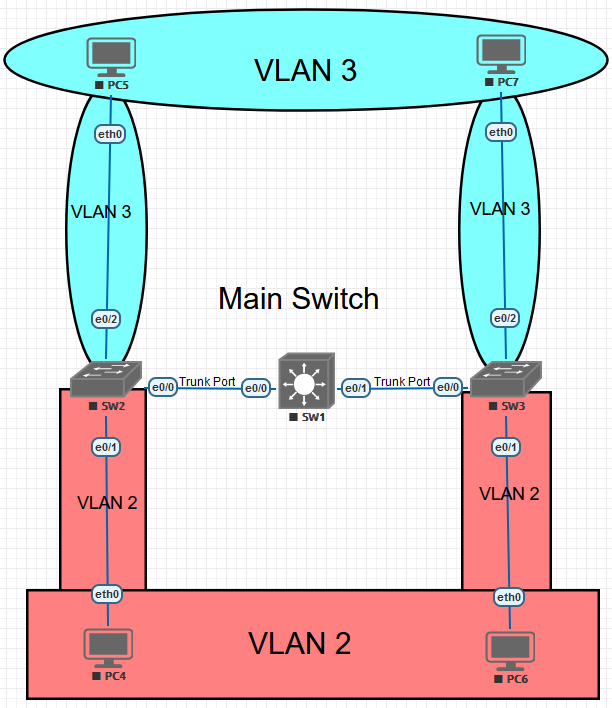
Step-by-Step Implementation
Step 1: Add and Connect Devices in EVE-NG
- Add 3 switches and 4 vPCS clients in EVE-NG.
- Connect devices as follows:
- SW2:
- PC4 → eth0/1
- PC5 → eth0/2
- SW3:
- PC6 → eth0/1
- PC7 → eth0/2
- SW2:
- Create trunk links:
- SW1 → SW2 (Trunk) → eth0/0, eth0/0.
- SW1 → SW3 (Trunk) → eth0/1, eth0/0.
Why This Step? You’re laying the physical foundation for a multi-VLAN design. Uplinks between switches must be trunked.
Step 2: Configure Inter-VLAN Routing on Main Switch
- On SW1:
Switch>
Switch>enable
Switch#configure terminal
Switch#hostname SW1

SW1(config)#vlan 2
SW1(config-vlan)#name Data_VLAN_2
SW1(config-vlan)#exit
SW1(config)#vlan 3
SW1(config-vlan)#name Data_VLAN_3
SW1(config-vlan)#exit
SW1(config)#vlan 4
SW1(config-vlan)#name Mgmt_VLAN_4
SW1(config-vlan)#exit

SW1(config)#interface vlan 2
SW1(config-if)#ip address 192.168.2.1 255.255.255.0
SW1(config-if)#exit
SW1(config-if)#interface vlan 3
SW1(config-if)#ip address 192.168.3.1 255.255.255.0
SW1(config-if)#exit
SW1(config-if)#interface vlan 4
SW1(config-if)#ip address 192.168.4.1 255.255.255.0
SW1(config-if)#exit

SW1(config-if)#interface eth0/0
SW1(config-if)#switchport trunk encapsulation dot1q
SW1(config-if)#switchport mode trunk
SW1(config-if)#switchport trunk allowed vlan 1,2,3,4
SW1(config-if)#exit

SW1(config)#interface eth0/1
SW1(config-if)#switchport trunk encapsulation dot1q
SW1(config-if)#switchport mode dynamic auto
SW1(config-if)#switchport trunk allowed vlan 1,2,3,4
SW1(config-if)#end
SW1#