



When starting an EVE-NG virtual machine in VMware Workstation, you may see the following error:
Virtualized Intel VT-x/EPT is not supported on this platform.
Continue without virtualized Intel VT-x/EPT?
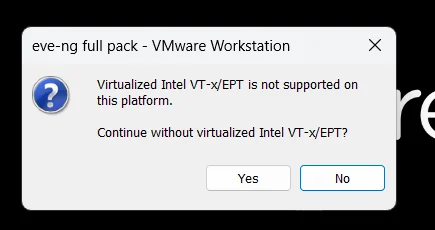
This error means VMware cannot provide nested virtualization to the EVE-NG virtual machine.
EVE-NG may still start if you choose Continue, but most QEMU-based devices will not work correctly. Images such as CSR1000v, ASAv, Palo Alto, FortiGate, Ubuntu, and other virtual appliances require nested virtualization.
The problem usually occurs because Windows Hyper-V, Virtualization-Based Security, Memory Integrity, or another Windows hypervisor component is using the processor’s virtualization features.
Recommended Method: Use the EVE-NG Virtualization Fix Tool
We created the EVE-NG Virtualization Fix Tool v4.1 to apply the required Windows changes automatically.
The tool checks your system and disables Windows components that commonly prevent VMware Workstation from using Intel VT-x/EPT or AMD-V/RVI.
What the tool does
The tool:
- Checks whether it is running with administrator privileges
- Detects your Windows version and processor
- Checks whether virtualization is enabled in BIOS or UEFI
- Prevents the Microsoft hypervisor from starting during boot
- Disables Hyper-V and related Windows virtualization features
- Disables Memory Integrity and Virtualization-Based Security
- Disables Credential Guard-related settings
- Checks whether VMware Workstation is installed
- Searches for the EVE-NG VMware configuration file
- Creates a troubleshooting report on your Windows desktop
Important Before Running the Tool
The tool disables several Windows virtualization features, including:
- Hyper-V
- Virtual Machine Platform
- Windows Hypervisor Platform
- Windows Sandbox
- Windows Subsystem for Linux
- Windows Containers
- Memory Integrity
- Virtualization-Based Security
- Credential Guard
Applications that depend on these features may stop working after you run the tool.
This can include WSL 2, Docker Desktop using the WSL or Hyper-V backend, Windows Sandbox, some Android emulators, and other Hyper-V-based virtual machines.
How to Run the Fix Tool
- Download and extract the ZIP file.
- Open the extracted folder.
- Double-click:
Run-EVE-NG-Fix.bat - Click Yes when Windows asks for administrator permission.
- Wait until the tool completes all checks and changes.
- Review the results displayed in the window.
- Restart Windows.
A report named the following will also be saved on your desktop:
EVE-NG-Virtualization-Fix-Report.txt
Required Steps After Restarting Windows
Restarting Windows is required before the changes can take effect.
After Windows restarts:
- Open VMware Workstation.
- Make sure the EVE-NG virtual machine is completely powered off.Do not use Suspend. The virtual machine must be fully shut down.
- Select the EVE-NG virtual machine.
- Open:VM Settings > Processors
- Enable:Virtualize Intel VT-x/EPT or AMD-V/RVI
- Click OK.
- Start the EVE-NG virtual machine.
- Open an EVE-NG lab and start a QEMU image.
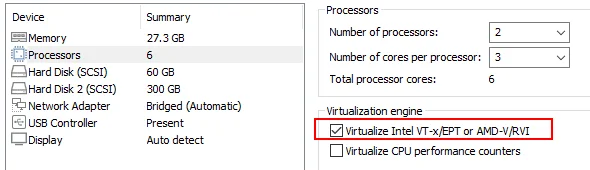
You can test the configuration by starting an image such as:
- Cisco CSR1000v
- Cisco ASAv
- Palo Alto Firewall
- FortiGate
- Ubuntu
- Cisco IOS XR
- Cisco Catalyst 8000V
If the QEMU image starts successfully, nested virtualization is working and the problem has been resolved.
If the VMware Virtualization Option Is Still Unavailable
If the Virtualize Intel VT-x/EPT or AMD-V/RVI option is unavailable or VMware still displays the same error, check whether hardware virtualization is enabled in your computer’s BIOS or UEFI settings.
Depending on your processor and motherboard, the setting may be called:
- Intel Virtualization Technology
- Intel VT-x
- Intel VT-d
- AMD-V
- SVM Mode
- Secure Virtual Machine
- Virtualization Technology
Enable the appropriate option, save the BIOS settings, and restart Windows.
The location and name of this option vary between computer manufacturers.
Manual Method
You can also apply the most important change manually.
Right-click the Windows Start button and select:
Terminal (Admin)
Run the following command:
bcdedit /set hypervisorlaunchtype off
Restart Windows after running the command.
Then open VMware Workstation and verify that the following option is enabled under the EVE-NG virtual machine processor settings:
Virtualize Intel VT-x/EPT or AMD-V/RVI
The BCDEdit command prevents the Windows hypervisor from starting during boot. However, on some Windows systems, disabling only the boot hypervisor is not enough.
You may also need to disable the related Windows features manually.
Disable Hyper-V and Related Windows Features Manually
- Open the Windows Start menu.
- Search for:Turn Windows features on or off
- Open the Windows Features window.
- Disable the following features when present:
- Hyper-V
- Virtual Machine Platform
- Windows Hypervisor Platform
- Windows Sandbox
- Windows Subsystem for Linux
- Containers
- Click OK.
- Restart Windows.
Disable Memory Integrity
Memory Integrity is part of Windows Core Isolation and may keep the Windows hypervisor active even when Hyper-V appears to be disabled.
To disable it:
- Open the Windows Start menu.
- Search for:Core isolation
- Open Core isolation settings.
- Turn off:Memory integrity
- Restart Windows.
If the option is controlled by your organization or cannot be changed, a Windows security policy may be enforcing Virtualization-Based Security.
If QEMU Images Still Do Not Start Inside EVE-NG
If the EVE-NG virtual machine starts but QEMU devices do not start, connect to the EVE-NG console or SSH session and run:
/opt/unetlab/wrappers/unl_wrapper -a fixpermissions
Wait for the command to finish, refresh the EVE-NG web interface, and start the device again.
This command repairs file ownership and permissions for EVE-NG images and lab files. It does not enable nested virtualization, so the VMware and Windows virtualization steps must already be completed.
How to Confirm the Problem Is Resolved
The configuration is working correctly when all of the following are true:
- The EVE-NG virtual machine starts without the VT-x/EPT warning
- The VMware nested virtualization option remains enabled
- EVE-NG opens normally
- A QEMU-based appliance starts successfully
- The appliance console becomes available
Starting only the EVE-NG virtual machine is not enough to verify the fix. You must start at least one QEMU image inside an EVE-NG lab.
Final Notes
VMware Workstation and Hyper-V can coexist in some Windows configurations, but nested virtualization performance and compatibility may vary.
For the most reliable EVE-NG experience in VMware Workstation, the Microsoft hypervisor, VBS, and Memory Integrity should normally be disabled.
After applying the changes, always fully power off the EVE-NG virtual machine before modifying its processor settings. Suspended virtual machines may continue using their previous virtualization configuration.
You can find the details on this link. How to disable Hyper-V on Windows for BlueStacks 4 – BlueStacks Support
